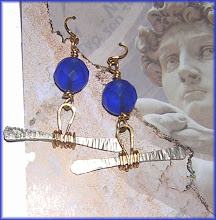
I rarely attend grownup parties. Something about the hermit in me. But occasionally it's made clear that my presence is expected. I'm thrown into fits of finding. Finding a top that isn't stained, missing a button, or too big, too small or too ugly. The top I found wayyyyy in the back of my closet was an odd pumpkin color. OK, themey but not too dated. Not too shiny. Phew! Here are Easy Earrings #6. Dressier than #5. But just as quick.
 Friday, October 31, 2008
Easy Earrings #6-Pumpkin Party
I rarely attend grownup parties. Something about the hermit in me. But occasionally it's made clear that my presence is expected. I'm thrown into fits of finding. Finding a top that isn't stained, missing a button, or too big, too small or too ugly. The top I found wayyyyy in the back of my closet was an odd pumpkin color. OK, themey but not too dated. Not too shiny. Phew! Here are Easy Earrings #6. Dressier than #5. But just as quick. 

Happy Halloween! and Earring #5
 These are technically yesterday's earrings. You know...those I have to be at my son's school for a Halloween party in 35 minutes and look festive earrings. I thought about skulls, but they seemed a little Maudlin even for Halloween. Anyway, basic, verrry very basic. And yet, I got three compliments. (I really do consider 10 year old girls the pivotal judges of fashion!)
Have a wonderful and safe Halloween! And send me pictures!
Wednesday, October 29, 2008
First Challenge Response--Thanks, Susie!
 It thrilled me when Susie emailed a picture of these earrings. Not only had someone seen the challenge, but she did a great job--I love how the tapered coil has a spiral at the end! The other day I mentioned my baby anvil. Easier than these mini anvils to use are bench blocks. Bench blocks are polished plates of steel used to flatten wire, hammer texture on metal, etc etc. In connecting with Susie today I found out she makes Sand filled bench block pads...great to keep a block from shifting, and muffle a bit of the BANGING noise. Check out her Etsy sight for more information. The.Antique.Pallete
Erin Dunn

Beware! Just when you thought you were a contented soap maker, the urge to play with little bits of sparkly glass will overcome you!
I met Erin years ago, shortly after I started selling on ebay. She was listing HUNDREDS of soap molds and soap making supplies and had started working with seed beads. She quickly developed a following with her new work as well and has never looked back. I love the variety of bead choices in this bookmark. She has the eye for mixing textures and materials that add up to a beautiful cohesive look. Here's a link to her ETSY store. LittleshopofErin
I met Erin years ago, shortly after I started selling on ebay. She was listing HUNDREDS of soap molds and soap making supplies and had started working with seed beads. She quickly developed a following with her new work as well and has never looked back. I love the variety of bead choices in this bookmark. She has the eye for mixing textures and materials that add up to a beautiful cohesive look. Here's a link to her ETSY store. LittleshopofErin
Violet Beauregarde Focal Set
 I got my greedy little hands on a set of Steve Petree's rounds. Just finished listing them on ebay. (Hmm, at 3 41 am) I hope someone else is a night owl. ) I wrote an introduction on Steve's beads a couple of days ago, but wanted to give you another peek at his work. I really like the organic swirls in his beads! Steve's
Easy Earrings #4-No headpins-CHALLENGE
 While these are neither the most successful earrings I've made, nor the most adventur-ous, there are two noteworthy factors involved.
The first is: You will always run out of headpins before you run out of wire. The second is: If you have wire it will rarely match your earring findings.
Solution 1: Make a spiral at the bottom of your wire to stop the bead.
Solution 2: Make a coil of wire (I used my tapered round nose pliers) to match your earring findings.
Challenge: Make a more interesting (better) pair of earrings using one or both of these solutions. Send me an email with a picture. I will probably photoshop it and crop it, but will then give you credit and be glad to connect a link to your selling sight of choice and/or email address.
Easy Earrings #3 Curly Swirlys
 I used 20g brass wire for these earrings. I went thru the steps about 6 times before I found a reasonably matched pair. But brass wire is cheap and all the extras made the final earrings better than the first.
Step 1) Cut about 6 inches of 20g brass wire.
Step 2) About 2/3 of the way across make a wrapped loop.
Step 3) On the short end, make a curl.
Step 4) Curve the longer end around as shown in the picture.
Step 5) Add a bead. (in the picture, it's shown without.) The bead is an optional bit of flash.
Step 6) Then make another curl running back the other direction.
Step 7) You may notice how RUSTY my baby anvil is. Clearly NOT a good sign that it's been used much lately. I took a small chasing hammer and flattened the earring. You can leave the wire round, but when flattened it looks a bit more finished. Use small light taps and avoid the beads. (Glass and steel don't get along well.) If you don't have a baby anvil, It's possible an old cookie sheet might do the trick. Good chasing hammers are expensive...and any hammer will do. Just remember, light taps. A little goes a long way.
I think the pictures are better than the explanation this time. Feel free to email me with questions.
Subscribe to:
Posts (Atom)